This short guide tells you how to prepare your garage floor concrete so you achieve a durable bond: remove coatings, repair cracks, and eliminate silica dust and oil contamination to prevent health risks and coating failure.
Key Takeaways To Prepare Your Garage Floor:
- Inspect the concrete for cracks, spalling, oil stains, and moisture; perform moisture vapor and pH tests to confirm suitability for coating.
- Repair damaged areas by routing and filling cracks with epoxy or polyurea, and patch spalls or delaminated concrete before coating.
- Clean the surface thoroughly: remove oil, grease, dirt, and old coatings with degreasers, mechanical abrasion, or pressure/shot blasting, then allow to dry.
- Profile the substrate using diamond grinding or shot blasting to achieve an ICRI CSP 2-4 texture for proper mechanical adhesion.
- Verify moisture content is within the coating manufacturer’s limits, apply a compatible primer, and follow recommended pot and cure times before the topcoat.
Assessing the Concrete Floor Surface Substrate
Inspect your slab for cracks, spalling, delamination, and visible contaminants; mark areas needing repair before coating. Use a moisture meter and adhesion checks to uncover hidden risks like trapped moisture or old sealers that will affect bond.
- contaminants – oil, grease, adhesives
- laitance – weak, powdery cement film
- moisture – high RH, efflorescence
Document findings in a preparation plan that sets cleaning, repair, and profiling priorities for each zone. After completing tests and hazard removal, follow the plan to prepare the surface for coating.
How-to identify surface contaminants and laitance
Scan the floor for stains, haloing, or glossy patches that signal oils, curing agents, or previous coatings; these block adhesion and require targeted removal. Carry out solvent wipe tests and small abrasion checks to confirm presence and extent.
Use pressure washing, alkaline cleaners, or approved chemical strippers to remove heavy soils, and perform tape or adhesion tests to verify removal. Be cautious with acids; strong acids can etch excessively and create laitance that weakens the surface.
Key factors affecting the Concrete Surface Profile (CSP)
Understand that desired CSP, substrate hardness, and aggregate exposure govern mechanical bond and dictate the prep method you choose. Measure profile and porosity against the coating manufacturer’s range to ensure compatibility.
- CSP – target roughness scale
- shotblasting – deep anchor profile
- grinding – controlled texture
Control profile by selecting appropriate methods-diamond grinding for light texturing or shotblasting for aggressive anchoring-and verify cleanliness after profiling. After confirming the achieved CSP and cleanliness, select the correct primer and proceed.
Executing Deep Cleaning Protocols
Clean the surface using mechanical grinding, or shot blasting to remove laitance and loose debris; you must follow up with a vacuum to capture dust. Inspect for cracks and contamination, and ensure the substrate is dry and free of contaminants before coating.
How-to remove oil, grease, and chemical residues
Tackle stains by first blotting pooled fluids, then apply a commercial degreaser or an alkaline cleaner and scrub with a stiff brush or rotary scrubber; follow with hot-pressure rinsing. Use appropriate solvents only in ventilated areas and wear protective gear to avoid exposure. Assume that you may need professional remediation for deeply embedded oil or grease spots.
- oil – absorbents, degreasers, hot wash
- grease – mechanical agitation, biodegradable cleaners
- chemical residues – neutralize and flush thoroughly
Tips for neutralizing the surface after acid etching (NOT RECOMMENDED)
Rinse the slab repeatedly after etching and test with pH strips across multiple spots; apply a baking soda solution to neutralize residual acidity and rinse until readings reach near pH 7. Avoid leaving any crystalline residue that could impede adhesion and remove standing water before coating.
Measure pH after each rinse and repeat neutralization where readings remain acidic; use a digital meter for accuracy and allow the surface to dry fully before adhesion testing. Assume that persistent low pH or visible efflorescence requires additional neutralization and drying cycles.
- acid etching – follow manufacturer dilution and contact times
- neutralize – use baking soda slurry and thorough rinsing
- pH – confirm neutrality before proceeding
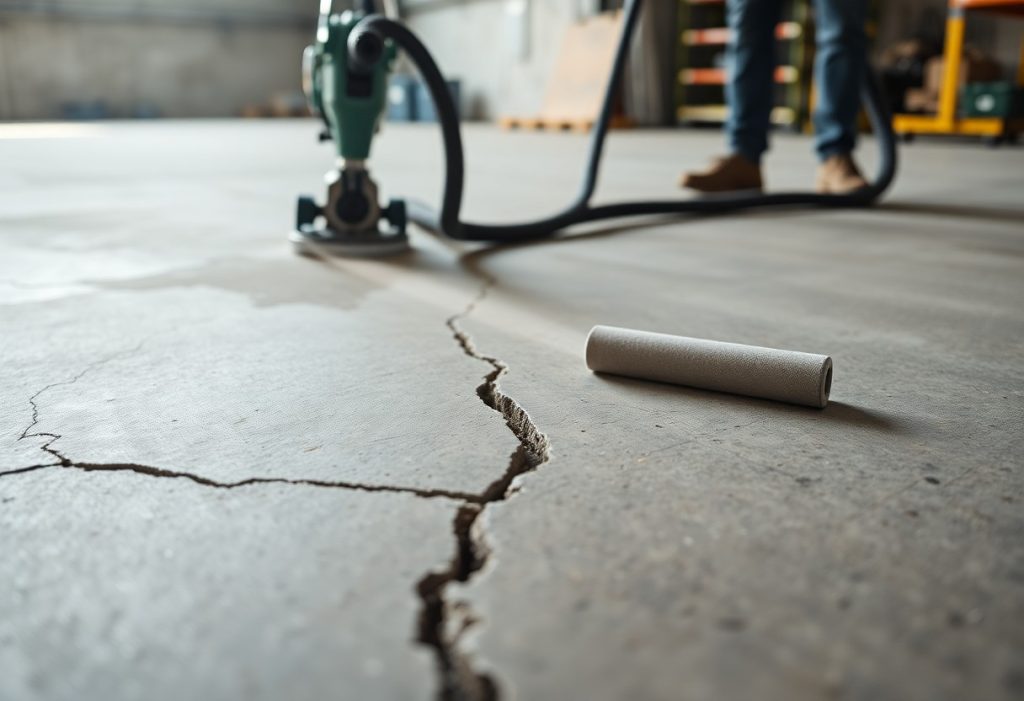
Mechanical Grinding and Profiling (HIGHLY RECOMMENDED)
Grinding removes laitance and exposes a textured concrete substrate for coating adhesion; you must control dust and make even passes to achieve a consistent profile. Use a high-efficiency vacuum and monitor surface roughness to confirm cleanliness.
Prepare the area with clear access, secure PPE, and verify equipment calibration before you begin; you should locate and mark cracks and oil spots for remediation. Use a reliable moisture test to confirm substrate readiness.
How-to select the right diamond tooling for your floor
Select diamond tooling by concrete hardness and coating requirements: use metal bond diamonds for dense mixes and soft bond diamonds for abrasive surfaces; match grit to the target profile. After you verify substrate hardness and contamination, run a test pass to confirm results.
- metal bond diamonds
- soft bond diamonds
- grit selection
Factors that ensure optimal mechanical bond strength
Consider achieving the specified profile (CSP), eliminating laitance, and ensuring complete surface cleanliness to maximize adhesion; you should correct spalls and remove oils before coating. After you confirm acceptable moisture readings, proceed with primer selection.
- profile (CSP)
- surface cleanliness
- moisture levels
Maintain consistent grinding depth, document profile measurements, and perform pull-off tests to validate mechanical bond strength; you should keep records and test patches for contractor acceptance. After you complete verification, document readings and proceed with coating installation.
- pull-off test
- profile measurement
- documentation
Patching and Repairing Imperfections
You must remove oils, paints, and other contaminants, chip out loose or delaminated areas, and grind high spots so patch material bonds fully. Any overlooked pits or hairline cracks will telegraph through the coating and reduce long-term performance.
- patching
- repairing
- concrete floor coating
- cracks
- divots
How-to fill cracks and divots for a level finish
Prepare your garage floor cracks by cleaning with a wire brush and compressed air, widening narrow gaps to the manufacturer’s recommended profile. Use a polymer-modified patch or epoxy for deep sections and feather small divots flush to the slab for a level finish.
Tips for treating expansion joints and control seams
Treat joints as movement points, not defects; install backer rod and a compatible flexible sealant sized to the joint width. Allow sealant to cure fully before coating to preserve joint function and prevent bond failure.
Install a bond breaker where the sealant meets the slab and avoid rigid fillers that restrict movement. Any failure to provide a compressible filler will transfer stress to the coating and cause cracking.
- expansion joints
- control seams
- flexible sealant
- backer rod
Performing Critical Moisture Testing
You must verify concrete moisture with both in-slab RH probes and surface tests before coating to avoid bond failure. Use ASTM F2170 probes alongside a calibrated vapor emission rate or calcium chloride test to confirm readings across the slab. Recognizing elevated moisture readings above manufacturer limits means you must delay work and dry the slab.
- Relative humidity (RH)
- Vapor emission rate (VER)
- Calcium chloride test
- Dew point
How-to measure Vapor Emission Rates accurately
Measure using a sealed chamber per ASTM F1869, ensuring the test area is clean, flat, and sealed for the full 24-hour period to report lbs/1000 ft²/24 hrs. Take multiple tests across low and high spots and correlate with RH data to catch anomalies. Recognizing inconsistent VER results requires retesting or applying moisture mitigation.
Environmental factors that impact coating adhesion
Humidity, substrate temperature, and airflow determine how coatings cure and bond; you should keep conditions within the coating’s specified range to prevent trapped moisture and adhesion loss. Recognizing out-of-range conditions means postpone application until parameters stabilize.
Surface porosity, recent pours, and nearby moisture sources increase vapor drive and risk of alkali contamination, which undermines bond strength; test for salts and high local RH before proceeding. Recognizing localized vapor pressure or rapid temperature swings prompts extra measures like barriers or dehumidification.
- Surface porosity
- Ambient humidity
- Substrate temperature
- Salt/alkali contamination
Final Debris Removal and Inspection
After you remove bulk debris, sweep and vacuum the area thoroughly so no loose grit remains; trapped particles can create imperfections and weaken adhesion.
Inspect the floor for embedded grease, paint, or pitting and address each issue with targeted cleaning or grinding to protect coating performance. This confirms the surface meets application standards.
- debris removal
- concrete floor coating
- final inspection
How-to achieve a dust-free surface before application
Use a high-power shop vacuum, follow with tack cloths or a microfiber mop, and blow out joints with compressed air to remove fine dust and grit that compromise finish quality. Maintain low humidity to avoid moisture contamination.
Tips for a final walkthrough to guarantee quality
Perform the walkthrough under strong lighting, scanning for pinholes, bubbles, and contamination that can ruin the topcoat; mark defects clearly for correction.
Check transitions, drains, and expansion joints for proper cleaning and slope, and verify repaired areas are cured and free of contaminants.
Document findings, photograph problem spots, and assemble a concise punch list for your crew.
- final walkthrough
- adhesion test
- dust-free surface
This protects your warranty and reduces the chance of costly rework.
Conclusion
Now to prepare your garage floor for coating you must remove all dust, oil, and coatings using degreaser and mechanical grinding to expose clean concrete. You repair cracks and spalls, then profile the surface with diamond grinding or shot blasting so the new coating bonds. You test for moisture, vacuum and tack-free wipe, then apply appropriate primer and allow proper cure before topcoat.
FAQ
Q: What are the first steps to prepare your garage floor before applying a continuous floor coating?
A: Start by inspecting the slab for cracks, delamination, oil stains, laitance, and old coatings. Remove loose material and existing coatings by mechanical grinding, shot blasting, or chemical strippers where appropriate. Clean oil and grease with a high-quality alkaline degreaser and scrub with brushes or pressure washing; use poultices for deep oil. Test and measure moisture and pH before further work. Repair cracks, spalls, and voids using appropriate epoxy or cementitious patching products, following manufacturer cure times. Create the required concrete surface profile (CSP) using diamond grinding or shot blasting; aim for CSP 2-4 for thin-film resinous coatings or follow the coating manufacturer’s recommendation. Vacuum and tack-rag the surface to remove dust, then apply primer if specified.
Q: How do I test and handle moisture in concrete before coating?
A: Measure moisture vapor emission rate (MVER) using a calcium chloride test (ASTM F1869) or perform in-situ relative humidity testing (ASTM F2170) with probes to check internal slab moisture. Target values vary by coating: many epoxy and polyaspartic systems require MVER below about 3 lb/1000 ft²/24 hr or slab RH below 75%, but consult the product data sheet for exact limits. For slabs above the allowable moisture limits, install a moisture mitigation system such as an epoxy moisture vapor barrier primer or cementitious moisture control membrane. Allow new concrete to cure at least 28 days under water-cure conditions unless the manufacturer approves accelerated curing or uses low-permeability primers designed for younger slabs. Re-test after mitigation to confirm compliance.
Q: Which surface preparation methods produce the best profile for coating adhesion and when should each be used?
A: Mechanical preparation methods produce the most reliable profiles for resinous coatings. Shot blasting achieves a uniform textured profile and is efficient for large areas and removal of surface contaminants. Diamond grinding is well suited for thin coatings and achieving a flat surface with controlled profile; it removes light toppings and laitance. Scarifying or mechanical scarifiers can remove thick toppings but leave a rougher profile that may need further leveling. Acid etching can be used on small residential projects where mechanical equipment is not available, but mechanical methods are preferred for consistent results. After profiling, perform a thorough vacuuming and tack-wipe to remove dust and loose particles, then perform adhesion or pull-off tests per industry standards before coating.